Sunday, January 29, 2012

{Real Parties} Baby Shower Planning

As I am writing this, I realized that I should have started the series with this post since planning should come before the invitations but OH WELL!
I am not sure about you, but I am definitely a list type of girl.  I make lists at work, at home, in my craft room, and sometimes even in the car.  Usually they each have something different on them and each one has a different time frame but they make me feel organized, somewhat:)  You can even see my list making skills by clicking HERE to see my list of resolutions. Yup, all 21 of them!
So knowing how I need to have a list for everything, I searched online for a cute planning sheet download for a baby shower. 
Sadly, I didn't find what I was looking for, so I decided to make one instead. 
I made a planning checklist and a guest list similar to my birthday party guestlist HERE.  Since our planning started before my sister knew what she was having, I made the checklist in a neutral color and added bumble bees because they are so darn cute.  I would have loved to do a bumble bee themed shower but if you know my sister, that is definitely NOT her style.  I do have to say that both of these printables were such a HUGE help in organizing the shower and keeping everything on track.  I hope they are a huge help to you if you are throwing a baby shower.


*Please note: Both printables are created by KT Designs and are for personal use only.  Please do not use my designs as your own or sell or alter them in anyway.  If you would like to include my printable on your website please direct people to my blog for downloading.  Thank you!
I would also LOVE it if you became a follower and/or sent a comment my way :)

To download the files, just click on the down arrow.


~Katania  

Wednesday, January 25, 2012

Fabric Basket Liner Tutorial

Did you ever set out to do something and then once you started you totally got sidetracked and ended up doing something completely different but with a very happy ending?
That is exactly what happened to me.
I went downstairs to my craftroom to CLEAN!
Sadly, the room is still not finished and I have managed to consistently pile my stuff on my table, the couch, the floor, etc., you get the point right?
So I started to clean off the table and then I found a basket I was given a gift in from one of my students.  A light bulb went off in my head and I said to myself, "I could use this to organize my craft supplies, but I need to pretty it up a bit."
Somehow through all the cleaning and the craft ideas spiralling through my brain, I decided to use a stripped fabric I had laying around to make a basket liner.
Great idea without a plan!
You might ask me, have you ever made a basket liner before?
NOPE!
Do you have a pattern to make one?
NO!
So what's a girl to do...
make one anyways:)

So that's what I did.  Sadly, I didn't take any pictures of the process, I was too excited about finishing it but here are some directions to follow.  Hopefully they make sense and are helpful to you.

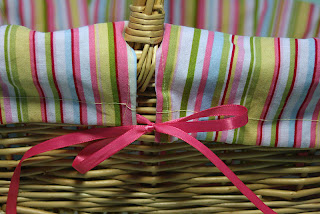
Using the basket as a guide, I measured the bottom portion of the basket and added about a half inch on each side for a seam allowance.  Then I measured the two narrow sides only then realizing that the top part of the basket actually flares out.  Not wanting to bother with angles, I decided to cut the two sides at the widest length and then gather the material at the bottom leaving room for your seam allowance.  You can gather the material any way you want but I was lazy and decided to make two tucks in the material.  After I sewed the two sides to the bottom, I measured the two long sides.  It was here that I noticed the handles and realized I had to figure out a way to go around the handles and still have the liner hang over the sides.  Leaving that for later, I cut the two long sides at the widest part and sewed them to the bottom rectangle once again tucking the fabric and leaving material for a seam allowance.  I then pinned and sewed the edges together on all four sides.  After I placed the liner in the basket, I cut slits where the handles would go and measured the length of how far I wanted the liner to hang over.  I folded under the slit for the handles in order to make a nice clean edge.  Then I pinned and sewed a wide seam so I could add a ribbon through the liner.  I then threaded two ribbons through the seam and tied a pretty bow next to the handles. 
Here are the pictures of my new basket liner.
Isn't she pretty?


What do you think? 
The whole process only took me a couple of hours while my son napped and I am not an experience seamstress.  I think I might have to find some more baskets to make liners for :)

~Katania


Friday, January 20, 2012

{Real Parties} Baby Shower Invitations

My Sister!  Doesn't she look amazing with her little baby bump:)
My baby sister is due in about three weeks and I am soooo excited to meet her baby girl.  With the help of my mom and my sister's mother in law, we threw her a baby shower right before Christmas.
Yes, I know it was a pretty crappy time to throw a shower but it went so smoothly.  Instead of having a super long post, I figured I would break up the pictures into different categories, similar to my birthday series. 

Welcome to
{Real Parties}
Baby Shower Invitations


Please note:  All personal information has been removed from this invitation.

We decided to go with a little girl/butterfly theme for the shower since my sister decided on butterflies for the bedding. 
Not wanting to overdo the theme, I went with simple but cute for the invitations.  I also had to make more than 50 of them so simple was definitely faster even though it took me forever to finish these.
Using my computer, I printed out the invitation on white card stock in black and pink ink.  I then cut and pasted it on premium light pink card stock.  Lastly, I cut out three onesies on my Cricut from the New Arrival cartridge.  I pop dotted the onesies and added pink and white twine for a clothesline.
I received many complements on these invites and I was so pleased with how they came out.

Here are some more pictures!


The invitation says:
Ten little fingers and ten little toes
Two little ears and one little nose!
Join us for a baby shower
honoring...

I ran out of the pink and white swirl paper so I also made some invitations with a pink and white hounds tooth print.


What do you think?
Project Alert: If you look closely at my pictures you can see two projects I have been working on.  I will be sharing both of them soon:)

Also coming up:
{Real Parties}
Baby Shower Planning (plus free printables)
Baby Shower Decorations
Baby Shower Favors
Baby Shower Mommy-To-Be Gift (plus free printable)

~Katania

If you are interested in baby shower invitations please email me HERE for current pricing and more options.  I would love to make something custom for you!

Monday, January 16, 2012

Glitter Ornaments

Okay, here's the last post with my glitter ornaments...
well until I remake my favorite one that broke this year (so sad).
I know I am kinda obsessed with these but they are sooooo pretty and sooooo easy to make.
I wanted to show you how the ornaments look with colored glitter and absolutely plain.  I can definitely imagine a whole tree filled with these beauties but it definitely won't happen anytime soon in my house.  I actually used two different types of glitter for these and they both worked perfectly fine.  Two are made with the traditional Martha Stewart glitter and the last one is made with a larger sized glitter that reminds me of tinsel.  If you are interested in making these ornaments click HERE for my tutorial.


If you haven't already figured it out, I am a little obsessed with glitter.  I absolutely LOVE it!  I am currently trying to find out how to cover the outside of candles in glitter.  If I figure it out and create something worth sharing, I will post it here.

Also, I will be sharing a very quick tutorial on how to tie the ornament hanger you see in the picture later in the week.

Happy Glittering!

Have you made any glitter ornaments or other household objects?
If so, I would love to see them.  Leave me a comment with a link to your blog and I will stop on by.

~Katania

Wednesday, January 11, 2012

Glitter Ornament Tutorial


Do you want to learn how to make a super easy and beautiful decoration for your house or quick gift? 
Here's my tutorial and tips for making dazzling glitter ornaments for your tree next year. (Sorry this post is a little late but at least you can pick up some clearance glass ornaments now :)

Glitter Ornament Tutorial
Step #1: Gather all your supplies.
Clear glass ornaments
Pledge Floor Finish with Future Shine
Martha Stewart Glitter (or any other fine glitter)


Step #2: Remove the tops of all your ornaments.


Step #3: Pour a generous amount of floor cleaner into your ornament taking great care to not let it run down the outside. 


Step #4: Gently swirl the floor cleaner around inside the ball, trying to cover the inside completely.  Pour any extra back into the bottle.  I found it helpful to insert the ornament into the top of the bottle to help drain any extra liquid or bubbles back in.


Step #5: Pour in a huge amount of your desired color of glitter. (Yes, these babies take a LOT of glitter, about half the small bottles of MS glitter)  Then swirl the glitter around making sure to cover the entire surface.


Step #6: Pour out any extra glitter and let the ornament dry for a little while.


Step #7: Place the tops back on the ornaments and add a ribbon to hang it.  Find a sturdy branch on your tree, hang your ornament and enjoy how the lights dance off the tiny flecks of glitter!

Here are some more pictures of the silver and gold ornaments.


What do you think?
I will be posting one more collection of ornaments soon as well as a very quick tutorial on how to make the ribbon hanger you see above in the picture.

~Katania


Sunday, January 8, 2012

Glitter Ornaments

Last year I searched the Internet to find out how to make glitter ornaments.  I was pleasantly surprised to find out how easy they are to make and how beautiful they are on the tree. 
I wanted to share some ornaments I gave as gifts with you today and then later in the week I will post a little photo tutorial on how I made them.
I found two different types of glass ornaments at Michael's by accident.  One was a little bit smaller and had a flat front and the other was larger and was completely round.  I honestly thought I had picked up two different round ornaments and had planned to return the flat front one but soon found it to be much easier to lay the vinyl on.
So I used the flat front ornament to make ornaments for all the kids in my family, complete with their name, date, and decorative snowflake.
What do you think?


I used a light pink, bright pink, and purple for the girls and a red for my little man.  I then cut out a snowflake in vinyl with my Cricut.  After applying the vinyl, I found a coordinating rhinestone to add to the center of each snowflake.  The back has the child's name and date cut out of vinyl.
I will be posting a tutorial and more ornament pictures soon!

~Katania

Thursday, January 5, 2012

Let It Snow Banner


I shared my Be Merry banner with you a couple of days ago and now I want to share my Let It Snow banner.  I also made this banner last year but was unable to share it with you because I hadn't started this blog yet.  Thankfully, I have a great way of sharing all my crafts now!
I used my Cricut to cut out all the components of the banner from the Winter Woodland cartridge.  This is a very versitile cartridge because of the banner cut outs and the great font with a shadow. 
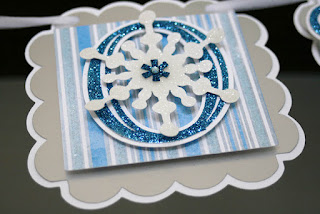
I used the scalloped square and cut it out in white for the shadow and silver.  I then cut a square out of blue, silver, and white striped paper which I pop dotted.  Lastly, I glittered each letter with bright blue glitter and glued it to a white shadow.  Snowflake brads, glittered snowflake cutouts, and blue rhinestones complete the look.
 I apologize but I forgot to take some pictures of the snowflakes on the first and last panel but they look exactly like the one in the 'o'.
Here it is...


I hope you liked it! 
I love that I can leave it up right until Valentine's Day!

~Katania

P.S. If you are interested in this banner or any other banner you have seen on my blog please email me HERE for more information and pricing options.  I would love to create something completely custom for you!

Monday, January 2, 2012

Top 10 of 2011

2011 was a great year!
Last year I started this blog in March and have found a wonderful way to share my thoughts, craftiness, and ideas with someone other than my poor husband who really could care less about anything you can find at Michael's or Joann's.
However, before I completely say goodbye to 2011, I wanted to share my top 10 posts of the year.
Here they are!


And the #1 most popular post of 2011 is...


WOW! What a year!
Thank you all for a fantastic start to my blog! Without your support and comments, it wouldn't be worth it.  I promise you I will be bringing you more and more crafty goodness this year!

~Katania