 |
| {source} Happy New Years! (Well...almost in few hours) During the time between Christmas and New Years I always find myself looking forward to the future and also to the past to see how far I've come. I know I have a lot to be thankful for this past year, especially my amazing son who has grown so much and has learned more than I could ever imagine. My little baby is now wearing big boy underpants and using the potty all by himself! It makes me want to cry with tears of joy and cry because he's not a little baby anymore. I am also thankful for my husband who tries so hard to support me in everything I try to do. I know hon, there are a ton of ideas in this head of mine. Lastly, I am thankful I was finally able to find the time for me and make the commitment to becoming healthier. A year later, 60+ lbs lighter, and two 5ks under my belt and I am feeling pretty darn good! Now to look to the future and plan for an even better year! I always think of the New Year as a time to start fresh with a blank slate in front of you. Now when I think of my New Year Resolutions (yes, plural, I have many) I think of them as a to do list. A very long to do list that I have a whole year to complete. If I don't finish something, it continues on to next years list and so on and so forth. Once I sat down and really started to think about what I wanted to accomplish this year, a theme started to appear. ORGANIZATION Yes, if you know me well, I appear to be very organized. However, I realized there is much room for improvement. I secretly envy and hate at the same time all those photos and blogs that show labeled containers in pantries, linen closets, craft rooms, closets, etc. Why oh why can't my house look like that? Well give me a year and let's see what I can come up with. After writing for about 30 minutes, I came up with 21 things on my resolution list. WHOA! That's a lot! You might be saying but some are really small things and it helps keep me organized. (Yup, there's that word again. I told you there was a theme.) So I thought I would share my personal resolutions with you to help keep myself focused and to maybe help inspire others. I also have a FREE New Years Resolution planner for you to download at the end of this post. Here's my 2012 resolutions!   
To help keep you organized as well, I created a blank New Year Resolution Planner in two colors, silver and gold with 10 possible resolutions.
You can print it out and write directly on the paper or place it in a frame and use a dry erase marker on the glass.
Please note: Both printables are created by KT Designs and are for personal use only. Please do not use my designs as your own or sell or alter them in anyway. If you would like to include my printable on your website please direct people to my blog for downloading. Thank you!
I would also LOVE it if you became a follower and/or sent a comment my way :)
To download the files, just click on the down arrow.
|
Saturday, December 31, 2011
New Year Resolutions & Free Printable
Thursday, December 29, 2011
Be Merry Banner

Even though Christmas is over, I still decided to share my Be Merry Banner I made last year but was unable to post because I hadn't started my this blog yet. This particular banner actually hangs in my mom's house and I will be sharing another banner soon which hangs in my house during the winter season.
I can't remember the paper pack I used for the banner but it was one of the Christmas ones found at Michael's or Joann Fabrics. I also added some red jingle bells between each panel of the banner for some extra festive fun! I do apologize for the photographs, I still have not mastered the art of taking photos on banners. If you have any suggestions I am definitely open to anything :)
Here it is...


For each panel, I used a scalloped circle and shadow in red and gold. Then I layered a festive print paper with pop dots. Lastly, I glittered all the letters with bright red glitter and added the shadow in green. Some red bows, jingle bells, and rhinestones completed the holiday look.
Here are some more detailed pictures.


Here are some close ups so you can see the detail of the paper, glitter, and bells.


Everything was cut by my Cricut and the
Winter Woodland cartridge.
I hope your holiday was merry!
~Katania
P.S. If you are interested in this banner or any banner you have seen on my blog please email me HERE for more information and pricing options. I would love to design something completely custom for you based on your interests and color choices.
Monday, December 26, 2011
{Gift Tip} Adding that little extra something...
Gift Tip #1

I know it is already past Christmas but I thought I would share with you a tip I use every year to help give that little extra something to my cookie trays.
Now I used to buy fancy trays and boxes to give my cookies away in but it got really expensive especially since I make more than a dozen different kinds of cookies and give away about the same amount.
This year I used plain white sturdy paper plates. I piled it high with all the different cookies, bon bons, and fudge then wrapped it in clear plastic wrap. One year I had a very pretty red wrap and one with holly on it but I haven't been able to find it again. I print out a little label that says, "Happy Holidays! I hope your celebration is extra sweet." and then cut it out with a circle punch or my Cricut. Now to add that little extra something, I cut out snowflakes on my Cricut and tied a ribbon around both the snowflake and tag. Voila, you have a super cute gift with that added touch of detail.

If you have a Cricut you really should have both When Its Cold Outside and Winter Lace. Both cartridges have tons of different snowflakes you can cut. Or if you don't own a Cricut, you can cut snowflakes the old fashion way by folding paper and cutting out different shapes. I really think it gives the gift a warm and festive feel even though it is so simple.

If you have a Cricut you really should have both When Its Cold Outside and Winter Lace. Both cartridges have tons of different snowflakes you can cut. Or if you don't own a Cricut, you can cut snowflakes the old fashion way by folding paper and cutting out different shapes. I really think it gives the gift a warm and festive feel even though it is so simple.
What do you think?
~Katania
~Katania
Sunday, December 25, 2011
Merry Christmas
Merry Christmas!
I hope your entire day is filled with the wonder and joy of children, delicious food and drink, and warm embraces from close family.
I myself am savoring this little piece of quiet heaven before my son wakes up and is so excited about all his presents. Let me just tell you, he's been a very good boy lately and our tree definitely shows just how much. I do have to say that I absolutely love this time of year and I love seeing the excitement, joy and wonder on my son's face as we talk about Christmas, Santa, and reindeer. I have however, not enjoyed the sudden exclamations while drive that I need to "WATCH OUT! A REINDEER!" I am not sure where that came from but more than a few times I have hit the brakes to narrowly avoid missing his imaginary reindeer.
On another note...
I do have a little gift for all my readers today!
A last minute gift idea for young children that will not only entertain them for a while but it will smell so good in your house.
Peppermint Candy Cane Play Dough

I have made all different types of scented play dough but I decided to get very festive this year and create some play dough for both the children of my friends and family.
Step #1: Make your play dough. (Don't worry, it is so easy to make)
1 cup of flour
1 cup of water
2 tsp. of Cream of Tartar
1/2 cup of salt
1 tbsp. of vegetable oil
Food Coloring (red)
Peppermint Extract (I just poured a little bit into the mix)
1. Mix everything together in a saucepan and cook on medium heat while constantly stirring.
2. The mixture will start to form a ball and get stuck on the spoon.
3. Cook for just a little longer and then remove the ball from the heat and let it cool.
4. Once it is cool enough to touch, I knead the dough so I make sure everything is mixed and really smooth.
5. Repeat the entire recipe but omit the red food coloring.
Once you have both colors finished and cooled, roll out half of each color into long snakes. Place them side by side and twist them together. I cut pieces about 6 inches long so they would fit into my canning jars but you can place them into baggies or larger jars or even Tupperware containers. This is what it looks like inside the jar.


Once you place it inside the jar it will look like a candy cane (sort of).
I then added my label to the top (see below for the FREE printable) and tied a red ribbon around the jar lid and candy cane. I think they came out super cute and I know the kids will really love them.


FYI: The play dough should last a couple of months if you keep it tightly sealed. If it starts to dry out, just knead in a few drops of water and it should get softer.
Now for the printable, just click on the down arrow in the box below! If you download my printable please follow my blog or leave me a comment. I really do love reading everything you have to say :)
Also please note: This printable is created by KT Designs and is for personal use only.
Have a very Merry Christmas with your family!
~Katania
Thursday, December 8, 2011
Christmas Card 2011
I may be a little late with ordering my Christmas cards this year but they are finally on their way to my house.
If there is one thing I absolutely love about Christmas it is sending Christmas cards to friends and family and receiving them in the mail. I love looking at the holiday family photos!
I also thought it would be nice to share my Christmas card with all of you this year!
Here is our family Christmas card for 2011!
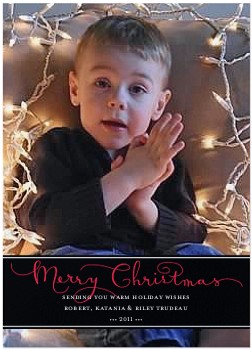
Elegant Script Wishes Christmas Card
Creating Christmas cards has never been this easy.
View the entire collection of cards.
Happy Holidays!
~Katania
Subscribe to:
Posts (Atom)