Monday, September 26, 2011

Birthday Gift

The little man and I attended a special second birthday for my niece on Saturday (well actually cousin but the 26 year age difference is better dealt with by becoming an auntie).  Thankfully, I was able to try out some of the little girl projects I have been dying to make.  
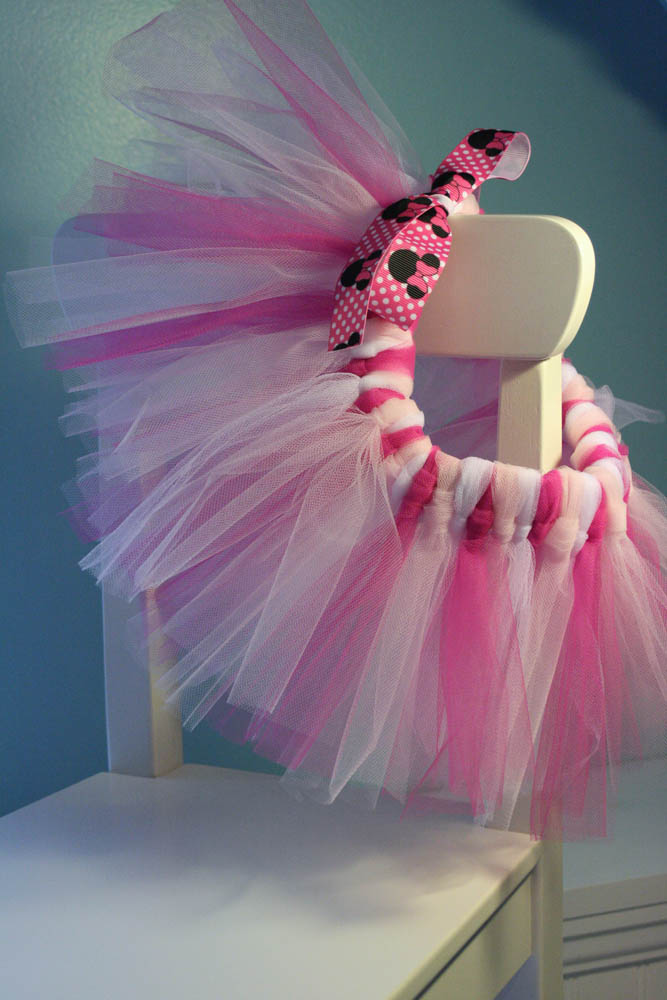
First up is the TUTU!  Seriously, if I had a little girl she would have one in every color combo I could dream up. 
They are so darn cute!
The theme of the party was Mickey Mouse Clubhouse so I was so excited to actually find some ribbon with Minnie mouse on it.  I used bright pink, light pink, and white tulle for the tutu. 
What do you think?


Staying with the Minnie Mouse theme, I ordered black and pink iron-on flocking and created an one of a kind onesie.  Let me just tell you how much I love this stuff.  I absolutely LOVE the texture of the flocking! I also ordered some flocking in white so I can cut out labels and pictures for my son's toy bins and I am so excited to see how it turns out.  It is awesome and looks so professional if you cut it out with your Cricut and it is so easy. 
*On a side note, if you are following the directions from expressionvinyl.com you might want to adjust your blade depth to 5 rather than 4.  I found that it did not cut it out completely and I had to go over it with an exacto knife.
Here's the onsie, complete with Minnie Mouse front and a little bit of ruffles on the back. 
It was my first time with ruffles, did I do okay?


Lastly, I created a matching set of clips for her to wear in her hair.  She has such beautiful curly brown hair and I know the pink will look adorable on her.  I also made a little card for the clips to go on for a nice presentation.  What do you think?


Happy Birthday Hope!
I can't wait to see how adorable you look in your new tutu!

~Katania

Thursday, September 22, 2011

Summer To Do List: Craftroom Curtains

Well it's been a while since I focused my attention on my summer to do list but I finally completed another project. 
Yes, shocking I know!
You can check out my complete to do list and all my updates by clicking HERE!

Well here they are in all their fabulous glory, my new pride and joys of my craftroom.  My new curtains, completely designed and sewn by yours truly.


(Don't you just love the outlet right in the middle of the windows and trim.  I'm not sure who designed that but let me just tell you how difficult it was to cut the trim to fit around it perfectly.)

Okay... back to the curtains.  I had found this gorgeous fabric at Wal-mart of all places a while back and planned on using it for something.  Well I decided to use it for my curtains.  Originally I wanted to use two coordinating fabrics with one color at the top and the yellow fabric on the bottom but I didn't have enough of the other fabric.  I also was planning on making the curtians long enough so if I really had to I could untie them and let them block out the sun.  Well once again I didn't have enough fabric, so I decided to take the best of both ideas.  I created a valance that looks like it is longer because of the blousing from the ribbon ties.  Let me just tell it you it took me a while to finish these because I was only working from my own design in my head and then I ran out of ribbon.  I do not have a tutorial but if you are interested please send me a comment and I'll write a post on it.

Here's the curtain laying out right after I finished it.

Here's a photo of the back of the curtain.  I used plain white cotton fabric to back the curtain to provide stability and privacy.  I also made sure no raw edges were shown because the windows are at ground level and I didn't want anyone seeing unfinished seams.


I also folded over the edges by the curtain loops and where the ribbon attaches.


If I really wanted to, I could untie the curtain and leave it hanging like this.  But I don't think I will because I really like the other look.


Here are a few more shots from both daytime and nighttime.


Don't you just love that fabric!  It goes so well with the blue walls and white trim.  It also is so bright and cheery, you just can't help but smile when you look at them.  I am already finding reasons to go downstairs and just stare at them.
What do you think?  Did I pass the sewing test?

~Katania

P.S. If you are interested in seeing a tutorial on making these curtains please leave me a comment.  Thanks!

Tuesday, September 20, 2011

{Birthday Series} Butterfly Collection Goodie Bags

I was asked to make some goodie bag tags that coordinates with the butterfly invitations and the butterfly banner.  You can check out the collection by clicking HERE and HERE!
Here's some photos of the invitation I created for this little girl's first birthday!  Please note: all confidential information has been removed to respect the privacy of my customer.


I used the same butterfly and scalloped shape to make the tags for the goodie bags.  I also added a little note to the back saying "Thanks for coming! xo, (name)"


She also wanted a couple of boy themed tags to give out to the boys attending the party.  We decided on a frog with the same saying on the back.


Here are the three tags all together.  Which one is your favorite?
Well, tags would not be complete without the bags to tie them to.  So here is the finished product!


If you are interested in ordering any goodie bags and tags please email me at ktdesigns-katania@hotmail.com.  I can send you more information, provide you with a quote, or create something custom for your event!

~Katania

Saturday, September 17, 2011

Great News!

Okay, I have some fantastic news to share with you. 
However, it is not the news I was referring to in my last post. 
This is something different, something BIG, something I am totally excited about and something that means more crafty goodness for your viewing pleasure!!!


My sister, my BABY sister, is pregnant (yes I have already shared this) BUT the best news is...


SHE'S HAVING A GIRL!!!


So in honor of this new little one coming sometime in February, I decided to write this post all in pink!!!  I am so excited because there is nothing sweeter than a little girl.  I am so excited to shop for little frilly dresses and bows and little shoes and well you get the picture.  I am so excited to make these little Mary Jane shoes I just purchased the pattern for.  Also, now I can start planning her baby shower!!!  Let me just tell you how many ideas I have for a little girl shower.  SO EXCITED!!!

~Katania


Thursday, September 15, 2011

{Birthday Series} Butterfly Collection Banner

I was asked to create a butterfly banner to coordinate with my butterfly invitations (see HERE) for a little girl's first birthday.  I can't even begin to tell you how much fun I had adding tulle and girly colors to this banner.  Now don't get me wrong, I love my little man but creating something for a little boy versus something for a little girl is completely different. 
 Obviously I am a glitter, and tulle, and ruffles,
and anything frilly kinda girl!

But anyways... back to the banner.
I used the same paper and colors as the invitation, as well as, the same butterflies on the three extra panels.  It is really difficult to see in the photo but each scalloped circle has a little puff of tulle in hot pink, light pink, and lime green behind it.  I also added a few smaller plain butterflies to the letters but then later added some glitter to them (keep scrolling down for the updates on the banner).


I love the added dimension the butterflies and tulle give the banner.  This baby is pretty long too since it includes 16 panels that are about 5 or 5.5 inches wide. 
Here are the updated photos of where I added some
rhinestones and glitter.


There are two other butterflies, however, the photo was really bad so I was unable to share it with you.

What do you think?  Do you like the added embellishments?

~Katania

P.S. Keep checking back because I have a HUGE announcement to make in the next couple of weeks!!!

Also, if you are interested in this banner or a custom made banner for your party or event please email me at ktdesigns-katania@hotmail.com for more information, a quote, or more options.  I would love to make something creative and custom for you. 

Tuesday, September 13, 2011

Slow Roasted Tomatoes

Have you ever tried slow roasting cherry and grape tomatoes?
Oh My Goodness! These roasted tomatoes are the best thing ever!
I couldn't keep myself from just popping them in my mouth and eating almost all of them!  The flavor really intensifies with the slow roasting process and you are just left with a sweet flavorful tomato.  You've got to try them!

*I apologize but I was unable to find the exact recipe I tried in order to give proper dues so if you are that person or you know who it is please leave a comment so I can make sure I add your blog link.

Recipe:
Fresh (like right from your garden) cherry and grape tomatoes
Olive Oil
Sea Salt
Pepper
Dried or Fresh Basil (optional)
Parchment Paper


1. Preheat your oven to 225 degrees (yes that low)
2. Cover two cookie sheets with parchment paper. 
3. Start cutting your cherry tomatoes in half and your grape tomatoes in half lenghtwise. (you want to make little cups with your tomatoes to hold all the yummy juices)


 4. Drizzle Olive Oil over your tomatoes.
5. Sprinkle your tomatoes with pepper, sea salt, and basil (you only need a little bit because the flavor is really intense without all the added spices)
6. Pop the trays in the oven for 3 hours!

Once they come out they look all shrived up but taste amazing.  Sadly, I forgot to take some after pictures and then the tomatoes were gone. YUM!  You can definitely eat them whole, mix them with pasta and some veggies, layer them on a toasted chabatta bread with cheese, or even use them on a sandwich.  They are so yummy and good for you too!

If you happen to have some more fresh tomatoes left over why not make my favorite salad with cucumbers, red onion, tomatoes, croutons (or crusty bread), and sometimes crumbled feta cheese.  I usually add some sea salt and pepper and a hearty drizzle of a good balsamic vinegar.
If you cut and add the first three ingredients to a bowl with the spices and balsamic vinegar, you can keep it in the fridge for a couple of days and then just add the croutons and cheese when you are ready to eat it.  This is my variation of a panzanella (not sure how to spell that) salad and it is so good.  You can also add some marinated artichoke hearts and kalamata olives too if you like those flavors as well. 

What do you like to do with your fresh tomatoes?

~Katania