Tuesday, April 19, 2011

Birthday Series: Construction Party Part Four: Goodie Bags


Since my little man's birthday theme was construction I really tried to tie in everything around dump trucks, building, rocks, etc.  We had about 8 children attending the party.  Most were under five but there were about three kids that were definitely older.  Keeping that in mind, I created two types of goodie bags which related to age.  The first thing all the kids received when they arrived was a plastic hard hat with their name on it.  Many of the kids wore these throughout the party.  Here's my little man sporting his!


Break time!


Too cute! I especially like the fact that throughout all the pictures I took of my little man wearing the construction hat, it is always backwards!!!  Oh well.  Once each child left they were either given a large goodie bag (for age five and under) or a small goodie bag of candy (for the older kids).  Here's what was included in each.


Supplies for large goodie bag:
Construction Countdown book
Small dump truck
Homemade edible play dough
Gift bag with thank you and name tag

Since I am a teacher, I am so thankful to have access to Scholastic book orders so I was able to order enough Construction Countdown books for each of the goodie bags.  I would imagine you could order them online somewhere as well.  I found the small dump truck at Target in their outdoor seasonal section with the pails and shovels.  I also picked up the cement mixer and bulldozer.  I made the edible play dough using this drink mix-aid play dough recipe.  It is super easy and fun to make.  It also lasts 6 months in a Tupperware container.  (Note: even though the website states it is edible, it is really, really salty so I would recommend monitoring your little one if they are prone to eating things.  Yes... I did try the play dough just to be sure of the safety of it all!)  Lastly, I picked up the bags at Walmart and printed out the thank you tags I created using Word. 

The tag says:
Thank you for coming to my party!
I hope you had loads of fun!

Here are a few more photos of the goodie bags!


As for the older kids, I knew they would not be interested in baby toys, baby books, and play dough so I went to the local candy shop and picked up some rock candy.  Be prepared to spend a little money because rock candy is very heavy and my local shop sold it for $10.99/lb.  I definitely have to say that it was worth every penny because rock candy is just delicious :)  I also used the same tag found on the yellow bag but in a smaller size.  Here's a close up picture.

Now doesn't that just look yummy!


If you have any questions about my goodie bags feel free to leave a comment and I will hopefully be able to answer them.


~Katania
 

Birthday Series: Butterfly and Eeyore Frame


I can finally share with you the frame I created for my niece's birthday on Sunday.  The party theme was butterflies and I know both Baby A and her mom LOVE Eeyore.  I made the invitations for the party as well and you can view them HERE.  Here's a picture of the invitations.


I started with just a matted 5 by 7 frame I picked up at Target.  Then I traced the mat onto a cute pink polka dotted paper.  I added 1st Birthday and the birthday girl's name using Lyrical Letters.  Then I used the Eeyore and butterfly from the Pooh and Friends cartridge.  A little bit of those fabulous faux pearls I used on my Easter Egg Collage and Voila, an adorable gift and keepsake for my niece :)
Here are some more pictures.  Enjoy :)


The birthday frame seemed to be a big hit with my family members and I can't wait to see Baby A's cute little face in the frame. 

~Katania

Saturday, April 16, 2011

Easter Decorations: Happy Easter Banner

Okay if you haven't figured it out yet, I LOVE banners!!!  I love creating a new banner with decorative paper for each holiday or special occasion.  Since I started this blog after many of the holidays passed you missed out on my Autumn banner, Thanksgiving banner, Winter banner, and Christmas banner.  I was actually inspired to start creating banners by the Cricut Message Boards and all the fantastic and creative ideas there. Click to register and view the Cricut Message Board.  I promise you won't be disappointed!  But anyways... I LOVE banners!  So in staying with the same theme as my Easter egg collage, I created larger Easter eggs from the Easter 2010 cartridge using the same paper and colors.  I then cut out Happy Easter using Lyrical Letters and ran them through my Xyron upside down so I could sprinkle Martha Stewart glitter on top.  This is the best way to glue glitter down if you want the letters to be flat.  If you are interested in a bubbled letter I use Glossy Accents to fill in the letter and then just sprinkle glitter.  Here is my banner! 


Hanging in the doorway between my living room and dining room.
 

Even the back is decorative!


Here are the close ups! Sorry for the pictures, I finished it at night so the lighting was really bad.


I tied each egg together with a little bit of tulle and some purple, pink, and green ribbon.  I also pop dotted the letters off the eggs (surprise, surprise).  I think I might add some of the faux pearls if I can find them in larger sizes.  I know the last time I went to Michael's they had a ton of different styles and sizes.  

If you are in LOVE with banners as much as I am please leave a comment with a link to your blog showcasing your latest banner design.  I would love to see them and leave a comment :)

Also if you are interested in purchasing a custom or holiday banner please leave a comment with your contact information or email me HERE for current pricing and options.

I am linking up at I Heart Nap Time
~Katania  

Easter Decorations: Easter Egg Collage


LOVE THIS!

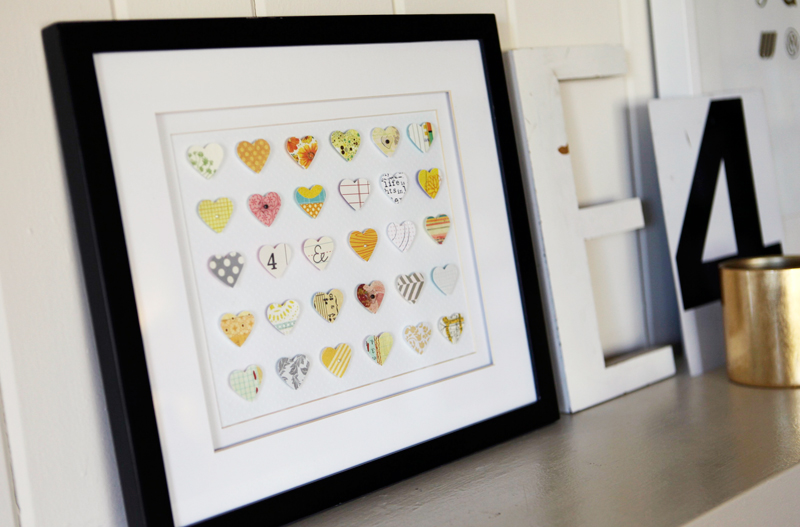
So a while ago I saw this picture from First Lady of the House and filed it away as inspiration for a future project.  I mean how cute is this idea of just repeating a holiday shape and matting it in a frame.

Source: First Lady Of The House

I absolutely adore her decorative frame but I just haven't been able to find a ornate frame I like.  Also I consider my house to be simplistic with a just a touch of modern lines.  I'm not really sure if this makes any sense just know my house is filled with neutral colors, clean lines, dark wood furniture, and black and white photography.  I do not like clutter so I tend to decorate just a little bit and then remove my decorations as soon as the holiday is over.  However, I finally completed my egg collage and I might just have to leave it out for a while.  I used my Cricut to cut out the Easter eggs from my Easter 2010 cartridge.  I planned on using two different types of eggs but I didn't like how each egg was a different shape and size after they were cut.  The bottom layer is a darker pastel and the top layer (flowers) is the lighter pastel.  I also pop dotted (yup, I'm using them again, I told you I love to use pop dots) each egg for dimension and added small adhesive faux pearls from Recollections.  I love these things!  I definitely have to pick up some more! 
Let me know what you think. :)


I added ribbon directly to the mat and just used my glue tape to attach it.


The frame is from Target and only cost me $10!!!

I placed the pearls in the center of each flower cut out.
I also found these two pictures online with two different versions of collages. 


Source: The Idea Room

Source: Ali Edwards

Since I absolutely LOVE butterflies I think I will create a collage using the butterflies for my new craft room downstairs (if we ever finish it).  I also like the idea about taking the glass out so the wings are not squished.  If you have created one of these collages, I would love to see it.  Just leave a comment with a link to your blog and I will be sure to visit and leave a comment for you :)

I am linking up at I Heart Nap Time
~Katania

Please follow me if you like what your see :)

Birthday Series: Butterfly Birthday Party Invitations

Here's a early sneak peek for you for the birthday party I will be attending with the little man tomorrow.  My niece will be ONE!!!  My cousin asked me to create 40 invitations for her daughter's birthday party.  The theme for the party is butterflies.    Enjoy:)


The invitation says:

Butterfly kisses,
Giggles and fun,
Our little Princess Butterfly (my niece's nickname) (original saying was flutterby)
(child's name) is turning (age)!

Flutter on down to:
(address)
(date)

RSVP to the Queen Butterfly

The wording on the invitation is not my original idea.  When I googled butterfly party invitation wording this is what I found and I fell in love with it right away.


I used BoBunny paper with polka dots for the background.


I pop dotted the butterfly so the wings would pop up when you took it out of the envelope.
I used my Cricut to cut out the scalloped circle and the butterfly.  Cartridges used were Mini Monograms and Create a Critter respectively. 
You can really see the dimension in this photo with the scalloped circle and butterfly wings.


This is how I package the orders.  My labeled bag and some ribbon to make a cute presentation.

If you are interesting in ordering custom invitations for any event (child's birthday, adult birthday, baby shower, bridal shower, etc.) please feel free to leave me a comment with your contact information or email me HERE for current pricing and options. Note: All invitations come with envelopes.

I am linking up at I Heart Nap Time
~Katania

Thursday, April 14, 2011

Birthday Series: Construction Birthday Part Three: Cake


Ahhh yes... the cake!  I thought about ordering a cake with a construction theme but couldn't find one I liked that wasn't Bob the Builder or Handy Manny.  Then I thought I would attempt to use fondant and create hills and such but yeah, I definitely don't have the time for that.  So ended up with this idea.  A chocolate cake with chocolate frosting to resemble dirt and mud.  I then crumbed some Oreo cookies on top and place three construction vehicles to look as if they are working in the dirt.  I added a little bit of grass and then voila all done. (Sorry about the crazy blue cake plate.  At the time I did not have a cake stand :( but now I do and I can't wait to share it with you.)  Here's some more pictures!

I even added some "dirt" to the dump truck.


Yes, I know he's two but the little star candles were so cute!
Of course a post about a birthday cake would not be complete until I shared the
birthday boy enjoying his delicious treat!
YUM!


I really think he enjoyed licking the frosting off of his trucks much more than eating the actual cake! 
Love that little man!!!

Stay tuned for the next part of the Construction Birthday Series: Part Four Goodie Bags :)

If you missed part one, part two, and part two and a half click below:


or click on the Birthday Series Page to see all postings :)

~Katania

BONUS Free Printable

Book Inventory


Here's another free printable for those teachers out there to help organize your books.  I plan on printing out a few of these and organizing my books by subject.  I then plan on stapling this inventory in the front of the folder that relates to the book's subject.  For example, every year I teach about entertaining beginnings for writing workshop.  I like to use published books to show examples of each type of entertaining beginning however, every year I forget which books I used and where I put them.  This year I wrote down each book title, author, and subject (i.e. Entertaining Beginnings: Sound) and then stapled it to my entertaining beginnings folder and Voila!  All organized for next years lesson :)  You could also fill this out at the beginning of the year and then double check that you still have all your books at the end of the year.

To download the book inventory, please click HERE!

Please note: This book inventory is created by KT Designs and is for personal use only.  Please do not sell any of my printables.  Thank you!

Also I would love it if you became a follower or if you left me a comment :)  Do you like the black and white printables or are you interested in some color?  Please let me know. Thank you :)

~Katania