Showing posts with label Tutorial. Show all posts

Wednesday, January 25, 2012

Fabric Basket Liner Tutorial

Did you ever set out to do something and then once you started you totally got sidetracked and ended up doing something completely different but with a very happy ending?
That is exactly what happened to me.
I went downstairs to my craftroom to CLEAN!
Sadly, the room is still not finished and I have managed to consistently pile my stuff on my table, the couch, the floor, etc., you get the point right?
So I started to clean off the table and then I found a basket I was given a gift in from one of my students.  A light bulb went off in my head and I said to myself, "I could use this to organize my craft supplies, but I need to pretty it up a bit."
Somehow through all the cleaning and the craft ideas spiralling through my brain, I decided to use a stripped fabric I had laying around to make a basket liner.
Great idea without a plan!
You might ask me, have you ever made a basket liner before?
NOPE!
Do you have a pattern to make one?
NO!
So what's a girl to do...
make one anyways:)

So that's what I did.  Sadly, I didn't take any pictures of the process, I was too excited about finishing it but here are some directions to follow.  Hopefully they make sense and are helpful to you.

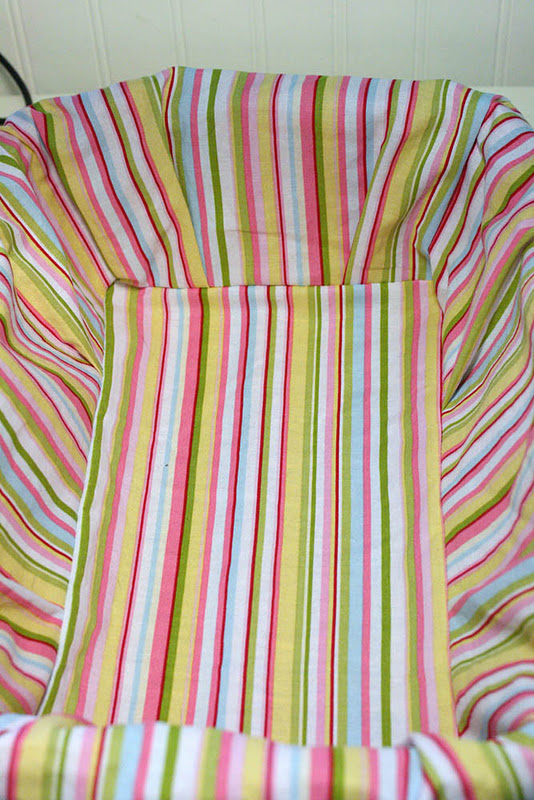
Using the basket as a guide, I measured the bottom portion of the basket and added about a half inch on each side for a seam allowance.  Then I measured the two narrow sides only then realizing that the top part of the basket actually flares out.  Not wanting to bother with angles, I decided to cut the two sides at the widest length and then gather the material at the bottom leaving room for your seam allowance.  You can gather the material any way you want but I was lazy and decided to make two tucks in the material.  After I sewed the two sides to the bottom, I measured the two long sides.  It was here that I noticed the handles and realized I had to figure out a way to go around the handles and still have the liner hang over the sides.  Leaving that for later, I cut the two long sides at the widest part and sewed them to the bottom rectangle once again tucking the fabric and leaving material for a seam allowance.  I then pinned and sewed the edges together on all four sides.  After I placed the liner in the basket, I cut slits where the handles would go and measured the length of how far I wanted the liner to hang over.  I folded under the slit for the handles in order to make a nice clean edge.  Then I pinned and sewed a wide seam so I could add a ribbon through the liner.  I then threaded two ribbons through the seam and tied a pretty bow next to the handles. 
Here are the pictures of my new basket liner.
Isn't she pretty?


What do you think? 
The whole process only took me a couple of hours while my son napped and I am not an experience seamstress.  I think I might have to find some more baskets to make liners for :)

~Katania


Wednesday, January 11, 2012

Glitter Ornament Tutorial


Do you want to learn how to make a super easy and beautiful decoration for your house or quick gift? 
Here's my tutorial and tips for making dazzling glitter ornaments for your tree next year. (Sorry this post is a little late but at least you can pick up some clearance glass ornaments now :)

Glitter Ornament Tutorial
Step #1: Gather all your supplies.
Clear glass ornaments
Pledge Floor Finish with Future Shine
Martha Stewart Glitter (or any other fine glitter)


Step #2: Remove the tops of all your ornaments.


Step #3: Pour a generous amount of floor cleaner into your ornament taking great care to not let it run down the outside. 


Step #4: Gently swirl the floor cleaner around inside the ball, trying to cover the inside completely.  Pour any extra back into the bottle.  I found it helpful to insert the ornament into the top of the bottle to help drain any extra liquid or bubbles back in.


Step #5: Pour in a huge amount of your desired color of glitter. (Yes, these babies take a LOT of glitter, about half the small bottles of MS glitter)  Then swirl the glitter around making sure to cover the entire surface.


Step #6: Pour out any extra glitter and let the ornament dry for a little while.


Step #7: Place the tops back on the ornaments and add a ribbon to hang it.  Find a sturdy branch on your tree, hang your ornament and enjoy how the lights dance off the tiny flecks of glitter!

Here are some more pictures of the silver and gold ornaments.


What do you think?
I will be posting one more collection of ornaments soon as well as a very quick tutorial on how to make the ribbon hanger you see above in the picture.

~Katania


Thursday, November 17, 2011

{Tutorial} Halloween Sensory Bin


During my Internet search for tot school, I came across a couple of websites that posted about sensory bins.  It seems to be a common activity for Montessori schools but thought it would be a fun, indoor activity for my little man.  I found some great ideas at Counting Coconuts and The Picky Apple and then went to Wal-Mart and Stop N Shop for more ideas.

 This is what I found:


Here's what's inside:
*2 bags of black beans
*1 bag of yellow split peas
*Pumpkin buckets
*Pumpkin ornament
*Ghost ornament
*Spider rings
*Glitter spider embellishments
*Glitter pumpkin embellishments
*Skeletons
*Sticky skeletons
*Stampers
*Bubbles
*Small sand shovel
*Large bin with lid


Here's the fun part!
1. Pour both bags of black beans and the one bag of split pea on the bottom of your bin.
2. Mix them together.
3. Layer your Halloween items both on top of and under the beans.
4. Give it to your child. (Monitor young children since there are many small items that are choking hazards)
5. Marvel at how long they stay engaged and all the fun things they do with the items inside.

Here's my little man enjoying his time with the sensory bin. 
I love how serious his little face is.


My little man loved filling the little pumpkin buckets up with the beans and then dumping them into his candy bucket.  Surprising, only a few beans escaped the bin since he was very careful to keep  everything in the bin and on the table.

I can't wait to make one for fall/Thanksgiving and then Christmas!
What items would you include for the
two holidays coming up?

~Katania

P.S. Stay tuned for a FREE PRINTABLE to use with this sensory bin!  It should be available this weekend:)

Saturday, May 21, 2011

Check it out!

Wahoo... I am so excited!
Amy over at The Mombot has featured my chalkboard pots on her Friday Link Love post along with some other fantastic ideas. 

Yes, I know this really isn't a huge deal but it's my first time being featured on
another blog so I pretty happy about it! 

Check out her Friday Link Love by clicking HERE.
While you are there, check out all the fantastic ideas she has. 
I definitely have to make the Take Out Menu Binder she made.  There's also a free printable too!  Love her blog!

If you missed my tutorial post you can check out my Chalkboard Tutorial by clicking HERE.

 Ahhhhh... Gorgeous!

~Katania

Wednesday, May 11, 2011

{Tutorial} Easter Pencil Topper


I am sure you have all seen the pencil toppers you can buy from any teacher supply store or Oriental Trading, especially around Valentine's Day.  Yeah, they are kinda pricey and not really that cute!  So I figured I could create them myself.  I actually created Valentine pencil toppers for my students this year but was unable to share them with you since I only just started this blog :)  So you get to see my Easter version.  Just let me tell you how much my students loved these.  Also not only are they getting a new pencil, it looks so darn cute as well! 

HERE'S THE TUTORIAL!!!
I will be including information so you can copy my design using your gypsy and cricut, however, you could also create this pencil topper using scissors and a hole puncher.  Due to technical difficulties, my gypsy file cannot be uploaded at this time.  Check back periodically to see if I have resolved the problem:)

Supplies:


Cricut Expression
Easter 2010 Cartridge
George and Basic Shapes Cartridge
Gypsy
Happy Easter Printout (download HERE)
Two coordinating colors/patterns of cardstock
Glue runner
Zots glue dots
Pencils
Embellishments

Directions:

1. Turn your Cricut on and insert George and Basic Shapes Cartridge.

2. Press the Center Point button on your machine and adjust the height to 2 inches.

3. Load your mat with the Happy Easter Printout and move the blade so it appears to be in the middle of your words. (Note: It usually takes me two or three tries to get it perfect.)

4. Highlight the shift key and the Q/Circle key and then press cut.  Repeat this for each circle.

5. Create a file on your Gypsy with the eggs at 4 inches and connect it to your Cricut.  Load your paper and press cut.
(Non Gypsy Users: Cut out Eggs using Easter 2010 Cartridge at 4 inches.  Punch top and bottom of the egg with a hole puncher.)


6. Remove from mat and set aside or create a pretty design and take a picture like I did :)

This makes me smile :)


7. Create a file with scalloped circles on your gypsy.  Load your second paper and press cut.
(Non Gypsy Users: Cut scalloped circles at 2 1/2 inches)


8. Remove from mat and set aside.  Turn off Cricut and Gypsy.


9. Gather all your supplies including all cut outs and glue.


10. Glue Happy Easter circle in the middle of the flower cut out with any type of glue runner.  I try to make it centered and have the indent of the scallop on the very top and bottom (it helps when you are lining them up with the holes)


11. Using Zots glue dots place one or two dots on the back of the flower shape.


12. Attach the flower shape to the center of the egg and let it cure for a bit.  Notice how the indents of the scallop line up with the holes :)

13. Slide your pencil gently through the two holes.  Voila!

Now comes the fun part!  Grab all sorts of embellishments and make the pencil toppers pretty.  Here are two other versions I created!


Just a few more photos!


If you have any questions, please feel free to contact me via comment.  I am still working on uploading my gypsy files so you can create the pencil toppers without all the hassle of creating the gypsy files but I am having technical difficulties.  I will post as soon as the problem is resolved! Stick around because I plan on creating yet another pencil topper for the end of the year and for my new students:)

~Katania