Monday, May 30, 2011

Happy Memorial Day and a Free Printable!

Happy Memorial Day!

I hope your long weekend was spent enjoying the beautiful weather with friends and family.  Hopefully you took some time to thank a soldier or Marine or thought of those who are at war right now.  I wish I could personally thank each and every soldier and Marine for his/her service and I wish I could send out as many prayers and condolences that are needed each day.  Our military truly embodies what it means to be BRAVE, STRONG, PROUD, COMMITTED, SELFLESS, and AMERICAN.  There are many other adjectives I could use but we would be here all day.  So in honor of this special day, I saw this quote and thought I had to create another printable with it because it is so TRUE!

If you are interested in this printable, please click HERE to download and make sure you thank a soldier or Marine today!!!

~Katania

Friday, May 27, 2011

{Friday Favorites} Memorial Day Decorations

With Memorial Day right around the corner and the summer fast approaching I though it would be great to get in a {Friday Favorites} edition devoted to Memorial Day Decorations.


 Source: KT Designs
Of course this day is very near and dear to my heart mainly in part because of my husband but as well as all the other soldiers and Marines who have fought or who are currently fighting for our freedom.  My heart goes out to those families who are waiting patiently for their loved ones to come home safely and especially to those families who have lost their loved one.  It takes a very special person to sign up and fulfill the requirements of all the military branches.  Of course, it also takes a very strong family to hope and pray each day as they wait for any news from overseas.


I am extremely proud of my husband and his devotion to his country. 

Sadly, I can't seem to find any other pictures of my husband in his dress blues.  Yes... I am a sucker for a man in uniform.  This picture was taken right after his graduation from bootcamp.  He looks so young :)

If you have been following my blog from the very beginning you know my story or you can click HERE to read it.  My husband signed up for the Marines after we were together for a bit and we dealt with 3 months of not seeing each other or talking on the phone while he attended Marine Corps bootcamp.  Then he went through 3 more months of SOI training.  Then in 2005-2006, he made it through his almost year long deployment to Fallujah.  Though the day before they were scheduled to leave Iraq, one of his best friends in the Marine Corps was killed by a car bomb.  

Lance Cpl. Christopher Cosgrove

You can read about him on the Marine Corps News HERE. Thankfully my husband was never redeployed and he is currently out of the Marines.  However, I still cry whenever a fallen soldier or Marine is honored on the news, even if I don't know who they are.  It was also very emotional and moving for me when I visited Arlington Cemetary a couple of years ago. 

So I say thank you... to the soldiers and Marines who have fought, are fighting, or who have lost their lives because of war.  I extend my most sincere and deepest sympathy to the families who have lost their loved ones. 

With that said...
Welcome to {Friday Favorites}
Memorial Day Decorations

You've gotta check out these blogs and their absolutely awesome ideas for Memorial Day.

The next three photos are from this blog and she has many more fantastic ideas for decorating your home for the holiday.


Check out the adorable FREE Memorial Day Bash Invites. 
Too cute!


Usually, I am not drawn towards vintage charm but I actually love these cupcake toppers for Memorial Day with vintage posters.  These would also make a great addition to any centerpiece.

Tip Junkie has 31 activites, crafts, and decorations all in a neat little post for Memorial Day.  I am absolutely in love with the flag shirt and just wished I had a little girl to make one for.  Ruffles and my little man do not really go together.

Download a free printable template for these adorable pinwheels.  I am definitely making these for my home.

Merriment Designs
I love the idea of sparkless sparklers especially with a two year old.  It could definitely be adapted to fit any theme as well.

Check out the Holiday Snob for some free printables and fun ideas for a Memorial Day BBQ!

Now don't we all want to be just like Martha.  I absolutely love her style and creativity.  She has 38 fantastic ideas to decorate for Memorial Day which could always be reused again for Fourth of July!

 I absolutely love this beach themed Memorial Day table decorations.  They are right up my alley!  Plus I probably have all the supplies in my house (or in my son's sandbox)!
 These are made of cloth!
 LOVE, LOVE, LOVE pinwheels!
Okay, I totally love white picket fences too!  I keep telling my husband we need to get a white picket fence and he just doesn't understand the appeal or the beauty of it.  Seriously, how can you not see that!

   Better Homes and Gardens
You can find 29 amazing ideas at this great site.  My goal is to have my photos look like the photos below.  Absolute picture envy!
 More pinwheels!
 Even more... told you I love them!
 Totally simple but absolutely perfect!
I LOVE this picture and want the blue vases and the peeling paint window so I can take some pictures myself.  LOVE IT!
I think I might just have to get some more pots and paint them red, white, and blue and add the geraniums, forget-me-nots and whatever the white flower is to them for this festive look!

Copy Cat Crafter
Here's a fun free printable for you!


Super cute tutorial on how to make Mini Firework Cupcakes


YUM!

Here's a Free Flag Printable for you


I hope you have a fantastic Memorial Day with your friends and family.  Please take some time to remember all the soldiers and Marines who have fought for our freedom and who have died fighting and pray for the safe return of those who are currently fighting overseas.

Source: Daily Kos
Semper Fi
~Katania

I am linking up HERE

Memorial Day Free Bonus Printable


Here's another free printable for Memorial Day.  I used a picture I had of the American Flag and just added Freedom Isn't Free to the bottom.  You definitely want to print this out using a photo printer and some glossy paper or use any photo printing service.

For the free photo download, please click HERE!

Note: This photo is from my own private collection and is property of KT Designs.  The download is for personal use only and I would appreciate it if you directed interested parties to my site directly for all downloads.  Thank you!

~Katania

Thursday, May 26, 2011

Memorial Day Free Printable

Happy Memorial Day!
(just a little bit early)


After looking for a while online, and coming up empty I decided to create a Memorial Day printable for my home and of course, for all of you!  I wanted the saying to show my pride of being an American but also touch upon the fact that freedom has a price and that price is many, many soldier's lives.  Though my son cannot read yet, I didn't want to use a quote that seemed morbid though I understand how it relates to Memorial Day.  So in the end I used the song lyrics from Lee Greenwood's song Proud to be American.  Perfect!

To download the printable you see above, click HERE!
 I would love it if you become a follower or leave me a message. 
I love reading all of your comments!

Also come back this Friday for my
{Friday Favorites} Memorial Day Decorations

~Katania

Note: This printable was created by KT Designs and is for personal use only. Please direct interested parties directly to my blog for any downloads.  Thank you!


Wednesday, May 25, 2011

Walk-It Challenge: COMPLETED

Well I did it! 
I completed the Weight Watchers Walk-It Challenge on Sunday May, 22nd!  I walked a totally of 3.1 miles or the equivalent 5K!
All I can say is that it felt great to get out there and start walking.  It was also very motivating to walk with many people who are in the same boat as I am.  We are all trying to lose weight!
Until Fleet Feet sports posts some pictures from the event I will share with you some of the pictures I took on my phone.

Here I am with my mom. 


We are in this journey together and she definitely keeps me motivated to keep going.  I am so blessed to have her as my mom because she is one the most sincere and caring people I know.  She is always helping me out in one way or another and my son absolutely adores her.  He calls her "Mimi" and asks for her constantly.  I am not sure how I could pull everything off without her help or make it through the day without someone to vent to.


Thank you for everything mom, you are the best!

Here's another photo of my mom with her best friend. 
She joined us on our walk and was a total trooper to deal with my slightly hysterical rantings about getting lost in Hartford because of my Garmin.  Does anyone else have a Garmin that tells you to turn onto a one way street going the wrong way?  Seriously, it's supposed to have the right directions!!! ARG!

How adorable are these ladies!!! 
We even received medals as we crossed the finish line. 
How cute is that?

Well after reaching yet another of my goals, I had to make a new one to achieve.  I plan to train and then run, yes RUN, a 5k in the beginning of July.  I will be looking for a training schedule and will definitely post it if I find a good one. 
Until then... watch me run!

~Katania

Saturday, May 21, 2011

Check it out!

Wahoo... I am so excited!
Amy over at The Mombot has featured my chalkboard pots on her Friday Link Love post along with some other fantastic ideas. 

Yes, I know this really isn't a huge deal but it's my first time being featured on
another blog so I pretty happy about it! 

Check out her Friday Link Love by clicking HERE.
While you are there, check out all the fantastic ideas she has. 
I definitely have to make the Take Out Menu Binder she made.  There's also a free printable too!  Love her blog!

If you missed my tutorial post you can check out my Chalkboard Tutorial by clicking HERE.

 Ahhhhh... Gorgeous!

~Katania

Thursday, May 19, 2011

I HAVE to make these!

OMG! I was blog surfing today during nap time of course and came across these adorable clothespins over at


Source: Scrapbook & Cards Today


Now these babies really put my clothespins to shame (:( sob).  Anyways... I absolutely HAVE to make these!  I can't wait to go to Walmart tomorrow for some paint, magnets, wire, and clothespins. Hopefully I will have another project done and a new post with my new clothespin butterflies soon. 
Also check out the bird houses too! 


I am thinking these would make an adorable mantel display.  Too bad I don't have a mantel but I might just invest in a couple of different birdhouses for my spring decor.

Ahhh... I just love when I find an idea I am excited about and can pull together pretty easily, don't you?

~Katania

Tuesday, May 17, 2011

Monkey Frame

For my niece's birthday I created a decorative frame for her parents to display a birthday photo of her.  The frame included Eeyore and a butterfly as well as first birthday and her name.  You can read all about it and view pictures HERE.  I was pleasantly surprised by how many people really liked the frame and was super excited to bring in a new order.  The order I received was for a little boy's baby shower.  The request was for a monkey theme with the colors blue and cream.  They also wanted the first and middle name on the bottom of the frame.  This is the design I came up with!
What do you think?


I used Create a Critter for the monkeys and the vine and was able to open up my new cart (Happy Mother's Day to me) Nate's ABCs for the letters.  I love how schoolbookish the letters are (lol, not really sure if that is a word but I like it).
Now some close ups...

 Sorry for the horrible photos, it has been raining here nonstop for a few days now and I had to drop off the frame on Monday so I didn't have any time to take some new photos outside.

 I am not sure if you can tell but the two monkeys are pop dotted just a little bit to give them some dimension.


 How stinkin' cute is this little guy!!!

I absolutely love making these frames because they are so fun and easy to make and the sky really is the limit.  Who am I kidding... I love any excuse to craft and make something beautiful or just plain cute.  Thanks for looking :)

~Katania

Friday, May 13, 2011

I DID IT!

Okay, so it took me 9 months to gain it and 2 years and 2 months to lose it.  Seriously?  Yeah, 2 years and 2 months to lose the baby weight!!! The sad thing is that I just started my weight loss journey right after Thanksgiving of 2010 and have already lost 33.8lbs with WW.  So I am pretty psyched that I am finally at my pre-pregnancy weight!!!! WAHOO!

So here's a cheers to my pre-pregnancy weight and a moral boost to keep going.
(Thank you to all my friends and family who are extremely supportive and remind me everyday how great I look.  Love you guys!)

In order to keep going with my weight loss and motivate myself through the tough times, I create small goals for myself.

Here's my next two goals:
Lose 35lbs by Memorial Day (totally on track)
Lose 40lbs by the end of the school year (June 23rd)
Once I hit 40lbs I will be getting a new hairstyle!

Also I plan on walking a 5K on May 22, check it out HERE and I want to eventually run a 5K before next year!

What are you doing to keep yourself motivated to keep losing?

~Katania

Wednesday, May 11, 2011

{Tutorial} Easter Pencil Topper


I am sure you have all seen the pencil toppers you can buy from any teacher supply store or Oriental Trading, especially around Valentine's Day.  Yeah, they are kinda pricey and not really that cute!  So I figured I could create them myself.  I actually created Valentine pencil toppers for my students this year but was unable to share them with you since I only just started this blog :)  So you get to see my Easter version.  Just let me tell you how much my students loved these.  Also not only are they getting a new pencil, it looks so darn cute as well! 

HERE'S THE TUTORIAL!!!
I will be including information so you can copy my design using your gypsy and cricut, however, you could also create this pencil topper using scissors and a hole puncher.  Due to technical difficulties, my gypsy file cannot be uploaded at this time.  Check back periodically to see if I have resolved the problem:)

Supplies:


Cricut Expression
Easter 2010 Cartridge
George and Basic Shapes Cartridge
Gypsy
Happy Easter Printout (download HERE)
Two coordinating colors/patterns of cardstock
Glue runner
Zots glue dots
Pencils
Embellishments

Directions:

1. Turn your Cricut on and insert George and Basic Shapes Cartridge.

2. Press the Center Point button on your machine and adjust the height to 2 inches.

3. Load your mat with the Happy Easter Printout and move the blade so it appears to be in the middle of your words. (Note: It usually takes me two or three tries to get it perfect.)

4. Highlight the shift key and the Q/Circle key and then press cut.  Repeat this for each circle.

5. Create a file on your Gypsy with the eggs at 4 inches and connect it to your Cricut.  Load your paper and press cut.
(Non Gypsy Users: Cut out Eggs using Easter 2010 Cartridge at 4 inches.  Punch top and bottom of the egg with a hole puncher.)


6. Remove from mat and set aside or create a pretty design and take a picture like I did :)

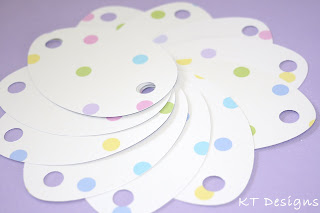
This makes me smile :)


7. Create a file with scalloped circles on your gypsy.  Load your second paper and press cut.
(Non Gypsy Users: Cut scalloped circles at 2 1/2 inches)


8. Remove from mat and set aside.  Turn off Cricut and Gypsy.


9. Gather all your supplies including all cut outs and glue.


10. Glue Happy Easter circle in the middle of the flower cut out with any type of glue runner.  I try to make it centered and have the indent of the scallop on the very top and bottom (it helps when you are lining them up with the holes)


11. Using Zots glue dots place one or two dots on the back of the flower shape.


12. Attach the flower shape to the center of the egg and let it cure for a bit.  Notice how the indents of the scallop line up with the holes :)

13. Slide your pencil gently through the two holes.  Voila!

Now comes the fun part!  Grab all sorts of embellishments and make the pencil toppers pretty.  Here are two other versions I created!


Just a few more photos!


If you have any questions, please feel free to contact me via comment.  I am still working on uploading my gypsy files so you can create the pencil toppers without all the hassle of creating the gypsy files but I am having technical difficulties.  I will post as soon as the problem is resolved! Stick around because I plan on creating yet another pencil topper for the end of the year and for my new students:)

~Katania